ISO, Aperture and Shutter Speed Explained
By Anna Jones,
27th March 2025, 15 min read
ISO, aperture and shutter speed are the three key settings of your camera. They work together to control how much light enters your camera and reaches your sensor, ultimately determining the brightness and quality of your image. Adjusting one of these three settings means compensating another, and it is the relationship between these aspects, known as the exposure triangle, that is important for every photographer – amateur or professional – to understand.
Mastering ISO, aperture and shutter speed allows you to move away from automatic mode, providing you with more creative control over your shots. As you focus on honing your skills, protecting your equipment with camera insurance from Eversure means both your photography knowledge and gear are protected. This guide will break down each element, explain how they work together and help you choose the best mode to shoot in to achieve your desired results.
ISO
ISO represents your camera's sensitivity to light as a numerical value. This value follows 'ISO', so your camera will read ISO 500, ISO 1000 or ISO 1600, for example. Typically, cameras offer an ISO range of 100 to 2300, but some specialist and advanced cameras see ISO into the hundreds of thousands.
The ISO numbers were set by the International Organisation for Standardisation, hence the name ISO, and were used to indicate the sensitivity of a camera's film to light.
The higher the ISO number, the more sensitive your camera is to the light. An ISO of 3200 will result in a lighter, higher exposed photo.
The lower the ISO number is, the less sensitive your camera is to the light. An ISO of 100 will result in a darker, lower exposed photo.
The ISO settings of your camera are important when shooting in low-light settings. Increasing your camera's sensitivity to light will help you increase the exposure, even with reduced amounts of light reaching the sensor.
However, higher ISO settings come at the cost of image quality as they can cause something called 'digital noise'. A noisy photo will have a grainy texture, most noticeable in areas of block colour. Unfortunately, although camera sensors are getting better all the time, the trade-off between sensitivity and quality is something that cannot be avoided. Depending on the make and model of your camera, you might only see noise when shooting in ISO's of 800 or higher.
To avoid noise, begin shooting with a low ISO and increase it only when you feel it is essential. If you do walk away from your shoot with noisy photos, don't panic. You can edit them using noise reduction software or by using tools in photo editing softwares.
Understanding how ISO works will allow you to maintain excellent image quality across a range of light conditions.
Aperture
Aperture controls both the exposure and the depth-of-field of a photo and is a characteristic of the camera lens, rather than the body.
Inside your lens is a set of overlapping metal blades that form an adjustable opening known as the aperture. This opening controls the amount of light that passes through to reach the sensor.
The aperture is measured in f-stops:
- The larger the f-stop number, the smaller the aperture, the darker the image and the deeper the depth-of-field. A large f-stop number would be considered to be around f/16.
- The lower the f-stop number (f/1.8), the larger the aperture, the lighter the image and the shallower the depth-of-field.
What is Depth-of-Field in Photography?
Depth-of-field is the area of a photo that appears sharp and in focus, in front of and behind the point of focus. Everything outside this area will appear blurry. The blurred part of a photo is known as 'bokeh', deriving from the Japanese word boke meaning blurred.
Having a shallow depth-of-field means only a small proportion of the photo is in focus. This is useful in portrait photography when you want to isolate a subject.
A deep depth-of-field means a larger proportion of the photo is in focus and is useful in landscape photography when you want everything in the background and foreground to appear sharp.
However, depth-of-field is not affected by aperture alone - it's also impacted by how close your camera is to the subject.
Camera lenses state their maximum aperture in their names. For example, the Canon EF 50mm f/1.8 lens has a maximum aperture of f/1.8.
Understanding how aperture affects depth-of-field will allow you to have creative control over how much of your photo is in focus versus how much has a bokeh effect.
Shutter Speed
Shutter speed determines how long the shutter remains open for and, as a result, how long light is able to pass through to the sensor.
Shutter speed is measured as a fraction of a second, although it may be written as a whole number. If your shutter speed is 60, this means it's 1/60th of a second. If the shutter speed is 1, the shutter will be open for one second.
A fast shutter speed (1/1000sec) will have a short exposure as it lets in less light. This is good for capturing brief moments in time, as it will create a sharp image of a moving subject. Fast shutter speeds are great for sports and wildlife photography.
Slower shutter speeds are longer exposures, letting in more light and capturing a longer period of time. If you want to blur motion, opt for a slow shutter speed. Slow shutter speeds are amazing for landscape photography when you want to capture waterfalls as well as night photography when shooting light trails.
The lighting conditions will also dictate what shutter speed you choose. Darker conditions require a slower shutter speed to let in enough light, whereas brighter conditions don't need as much light, so the shutter speed can be faster. This means that by increasing your ISO, you'll be able to use a slightly faster shutter speed.
When shooting with a slow shutter speed, be aware that it will also blur the motion of your camera, known as 'camera shake'. If your camera is not held totally still, the movement of the camera itself will also be captured in the photo. Cameras often have a feature for image stabilisation that uses motion sensors and internal motors to move the sensor or lens to counteract any camera shake. It only compensates for small movements and vibrations, so it's worth supporting the camera with a tripod or placing it on a table, the ground, a wall or something similar. If you are placing your camera on surfaces like these, put something down first to avoid scratching your camera and ensure your camera is secure, but don't worry, you are protected with our camera insurance.
Understanding shutter speed will allow you to have complete control over how motion is captured in your photos, allowing you to create really dynamic shots.
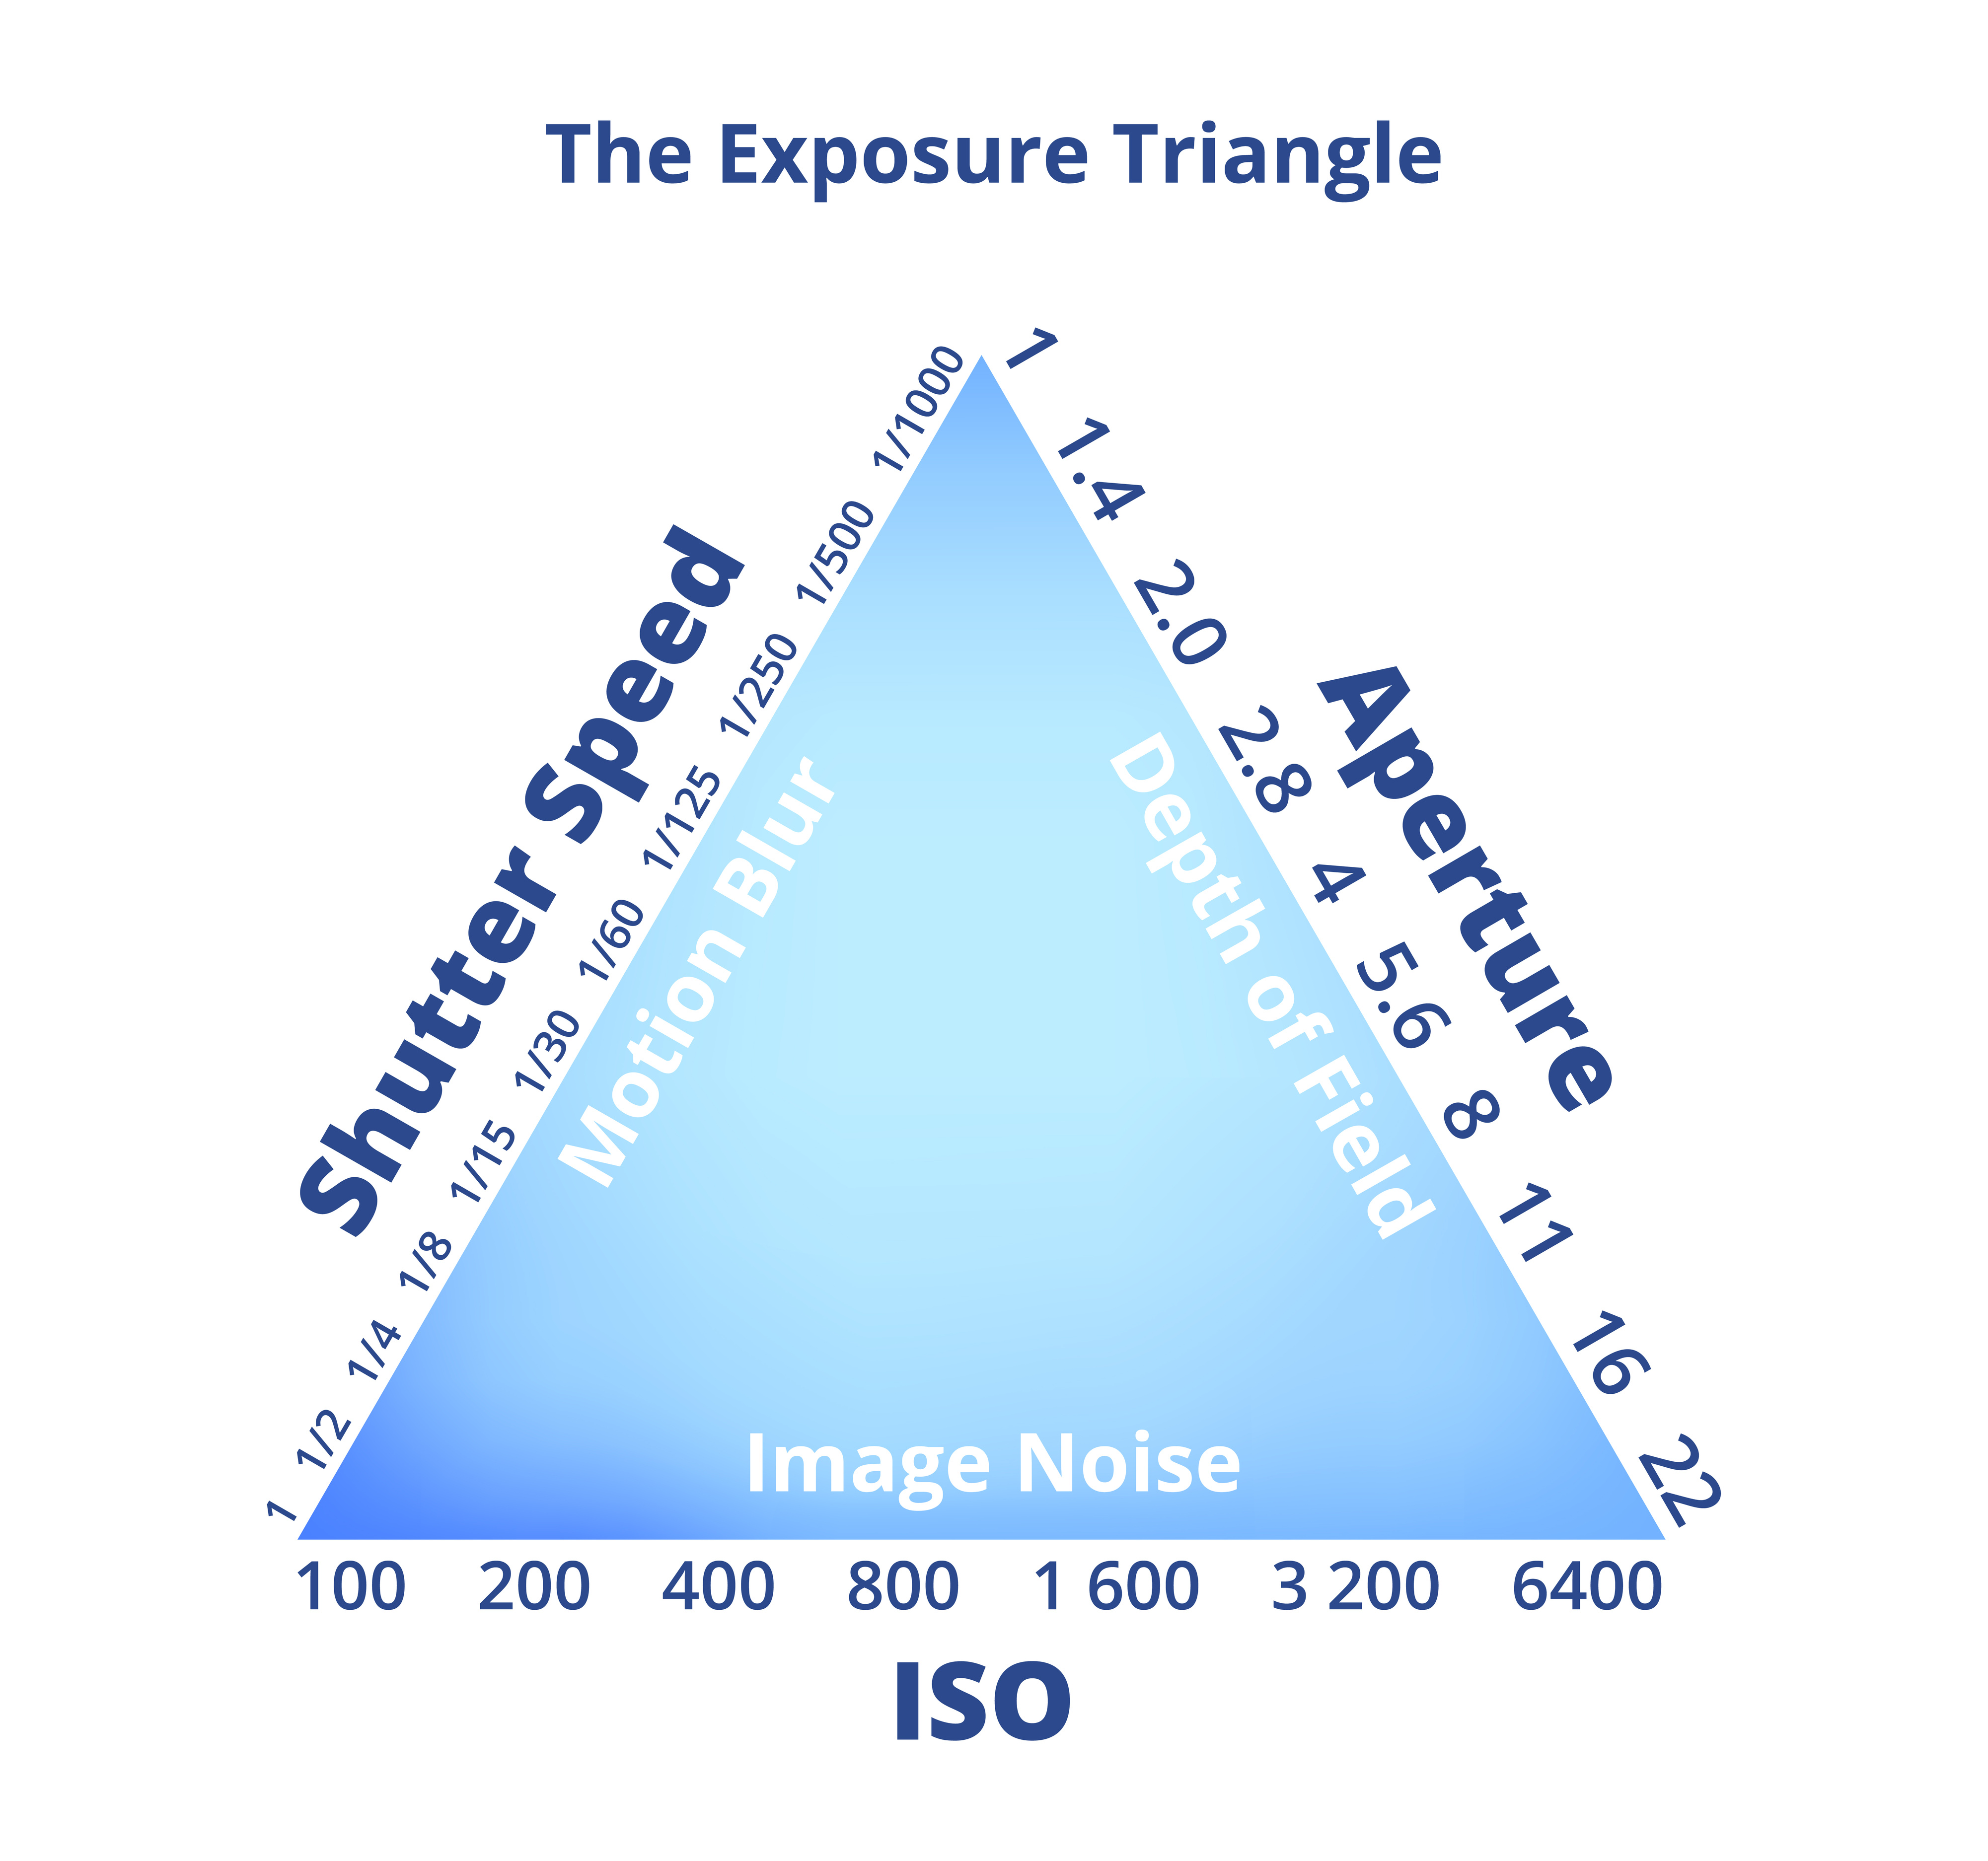
What is the Exposure Triangle?
Each of these components influences the other, which is why ISO, aperture, and shutter speed work together to form the exposure triangle.
Together, they control how much light enters the camera and reaches the sensor. This determines both the brightness and the quality of your photo.
When you adjust one component, the others are compensated to maintain proper exposure and balance. For example, if you focusing on capturing motion, you will prioritise shutter speed and so would opt to shoot in shutter priority mode. This will directly affect the ISO and the aperture. A slow shutter speed will prompt your camera to select a smaller aperture to limit the amount of light entering so that exposure remains balanced. On the other hand, a fast shutter speed could lead the camera to select a larger aperture to allow more light to come in. Fast shutter speeds might also cause the ISO to increase, therefore creating a higher level of digital noise.
Understanding the relationship between these three components and their dynamic will allow you to make more informed decisions to achieve the desired effect whilst maintaining proper exposure.
What Mode Should I Shoot in?
The mode you shoot in depends on your creative goals and how much control you want over each setting.
- Automatic Mode: This is best for beginners as the camera will adjust ISO, aperture and shutter speed for you. Be aware that auto mode will not offer you any creative control.
- Program Mode: This mode offers you partial control over settings like ISO, but the camera sets the shutter speed and the aperture.
- Aperture Priority Mode: Select this mode when you want to control the depth-of-field. To maintain proper exposure, the camera will set the shutter speed. This mode is good for portraits.
- Shutter Priority Mode: This mode is for situations where control over the motion is important, whether it's freezing action or capturing motion blur. The aperture will be set by the camera to maintain exposure. Opt for this mode for sports and wildlife photography.
- Manual Mode: The ultimate mode for total creative control. This is great for experienced photographers who understand the exposure triangle and want to control every aspect of their shot, as in manual mode, you adjust ISO, aperture and shutter speed. The camera will tell you what it thinks the correct exposure is but it won't make these adjustments for you.
Final Thoughts
The best way of learning and truly understanding ISO, aperture and shutter speed is by putting the theory into practice. Put your camera into manual mode and have a go at adjusting the different components. Pay attention to what works and what doesn't, and try to work out the reasons why. As you experiment, you'll learn the best combinations, and with time, you'll gain the confidence to shoot in manual mode. This will give you the freedom to create photos that reflect your creative vision.
Don't forget to purchase camera insurance so you can put all your focus into mastering ISO, aperture and shutter speed without worrying about your equipment.